Friday, March 11, 2022

 Altering Sleeves on a Man's Shirt

My sewing hiatus is over! It feels good to be back in my sewing room again.  I did not take my sewing machine with me on vacation at St. Simons Island, Georgia.  Therefore, I did not sew a single stitch for almost 5 weeks. 

I was tempted to begin a new project such as a jacket for my husband when I returned to my sewing room, but instead I opted for the alteration project I discussed in my last post.  I wrote that I would put shortening the sleeves on my husband’s shirt at the top of my sewing “to do” list for March.  So, the day after I returned home, I began the project of shortening the sleeves on a shirt I made for Dave about 3 ½ years ago.  The shirt has hung in the closet since I finished it because the sleeves were 2 ½ inches too long for him.  I am not sure why I did not realize the sleeves were that long before I finished the shirt.  I think it had something to do with the fact that he has no patience for trying on a muslin several times during the process of fitting!   Although I knew those sleeves needed to be shortened, I also knew it would not be fun to remove the cuffs and plackets from the sleeves and try to redo them!

Anyway, after I read Vanessa Nirode’s article, “How to Alter Men’s Shirts”, in the Spring 2022 edition of Threads Magazine, I finally decided to tackle the project.  Ms. Nirode’s instructions are clear and easy to follow.  However, there are several different ways to make the placket on a sleeve with cuffs, so you may not be able to follow the instructions exactly.  You will know when you examine the placket on the shirt you are altering.  Most shirts will have a placket overlap and a placket underlap.  The shirt I made did not have a placket underlap.  The pattern was Kwik Sew 3883.  Instead of a placket underlap, the pattern simply called for the edge of the underside of the placket to be folded over ¼ inch at the bottom edge and then angled up to the top of the placket and turned over again and stitched down.


I had my husband try on the shirt and I pinned a tuck around the sleeve to determine how much I needed to shorten.  The amount needed was 2 ½ inches.  

Then I removed (ripped out or unsewed) the placket overlap and the cuff.  Although the shirt did not have a placket underlap, it did have a hemmed edge at the underside of the placket.  I removed the hem so the edge would lay flat.

After pressing the sleeve and the parts I removed, I measured the circumference of the bottom edge.  I wanted to make sure that after I removed the excess length, the amount of fabric to reattach to the cuff would be the same as it was before I cut off the excess.  If the amount to be removed was relatively small, I would not be concerned with this because the excess could be taken up in the two tucks.  After I cut off 2 ½ inches from the bottom edge of the sleeve, the measurement around the bottom edge was ¾ inch more than the original measurement. 

I started just below the underarm seam of the sleeve and increased the seam by tapering it to the bottom edge so the seam would be 3/8 inches larger at the bottom edge.  That returned the measurement of the bottom edge to the original size. 


Next, I extended the placket slash line by the amount that I shortened the sleeve (2/1/2 inches). 


I turned the edge of the underside of the placket over twice and restitched it down.  I
 carefully sandwiched the other side of the placket between the edges of the placket overlap and reattached it using the same stitching lines that I used the first time.

The only thing left to do was to reattach the cuffs.  I pinned the cuff to the bottom edge of the sleeve starting with the underside of the placket and worked around to the side with the placket overlap.  That way I could pin the two pleats as I pinned the cuff to the bottom edge.  I carefully reattached the cuff by sewing on the original sewing lines.

After I completed the first sleeve, the second was easier and faster to do.  I did not remove the cuffs and plackets from both sleeves at the same time because I did not want to take the chance of reattaching a cuff to the wrong sleeve.  I did one at a time to make sure that did not happen.

If I make another shirt for my husband, I will make two changes to this pattern.  I will add a placket underlap and I will narrow the width of the cuffs. 

If you have an alteration that you are avoiding, I hope you will research how to do it and take the plunge.  You can usually find how to do almost any sewing alteration by doing an internet search;  checking Threads Magazine's archives; or searching a book on sewing alterations.   You can contact me by leaving a comment at the end of this post if you want some help with finding information on how to do an alteration.   I will be happy to help if I can.

Judy

#sew #altershirtsleeves

Friday, February 25, 2022


Resources to Help with Your Sewing Projects

Sometimes I find help with a sewing project when I am not even looking for it.  I have been talking with my husband about making him a spring jacket and a winter jacket.   Off the rack jackets don’t fit him well.   Any purchased jacket pulls up at the back edge and looks askew on him.  I assume it is also uncomfortable.  I have been thinking about doing a rounded back adjustment on a pattern for him. 

And then I received my Threads Magazine Spring 2022 Number 217 in the mail.  On page 43 there is an article titled “Fit for Your Posture” by Sarah Veblen.  In that article she covers three common pattern adjustments needed due to our posture: Pronounced Lower Back Curve, Rounded Upper Back and Forward Shoulders.  I think her instructions for making adjustments for a rounded upper back will work for making a jacket for my husband.  I am going to put adjusting a pattern for him on my “Sewing to Do” list for March. 

Also in the same Threads Magazine is an article titled “How to Alter Men’s Shirts, Part 2” by Vanessa Nirode.  She explains how to fix sleeve, shoulder and collar fit issues.  My husband has a shirt with sleeves that are too long for him.  The instructions given in Ms. Nirode’s article are clear and seem to be simple to follow.  With this article in front of me, I think I have the confidence I need to tackle the project.  Shorten sleeves on shirt for Dave will also go on my March “Sewing to Do” list.

I recently posted an article on my blog about designing a wardrobe.  In the current issue of Threads, there is an article titled “Spring Preview, Wardrobe Inspiration from a Stylist Who Sews” by Emily Hallman.  This is an interesting read about the new spring styles the designers are showing in their new collections.  She also talks about the new hues that will be prevalent.  She talked about the bright colors like clementine and flamingo that were seen in many designers’ collections.  You might want to read her article to get some ideas for your spring wardrobe.

Today we have a wealth of information available to assist us in any sewing project we desire to tackle.  So set your sites on whatever you want to sew and then educate yourself on how best to proceed.  The information you need is at your fingertips.  Just check your resources.  The resources may be available books on sewing techniques or articles in sewing magazines.  They may also be articles or videos on the internet.  Do your research and then start sewing!

Good luck with whatever sewing project you choose.  Happy sewing!

Judy

Monday, February 14, 2022

 Are You Ready to Design Your Own Wardrobe?

This is day 14 of my February sewing hiatus.  So far, I have not sewn a stitch.  That doesn’t mean I am not thinking about many sewing related items.  I have attended and enjoyed several Zoom meetings with the Lansing Clippers ASG Chapter groups.  And in my mind, I have planned several sewing projects for the future.

As I told you in my last post, I thought February would be a good time to do a little sewing research.  With that in mind I watched a video with Mary Ray entitled “Design Your Own Wardrobe”.  The DVD is published and sold by Threads Magazine.  Mary is a contributing editor for Threads.  She is also a well-known sewing instructor and an award-winning designer.


Several years ago, I published a series of posts on my blog about making a 12-piece coordinating wardrobe.
  So, I was intrigued by the title of this video.  Too bad I did not watch it before I made that wardrobe!  However, it is never too late to learn.  This video has a lot of valuable information that I can use every time I make a garment.

Mary Ray has arranged her video to cover all the subjects you need to understand before you begin making items for your wardrobe.  For example, one of the things she covers is identifying your body type.  She tells you how to determine if you are an hourglass, inverted triangle, triangle, rectangle, or circle.  She explains what types of clothes look good on each figure type. 

She also encourages you to focus on fit.  After all, if you make something that doesn’t fit right, you won’t enjoy wearing it or worse yet, you won’t wear it at all.  I spend a lot of time altering patterns to fit me and I think this is possibly the most important part of making a garment.  If you are interested in making a wardrobe, I suggest you get a basic pants pattern, a skirt pattern, a top pattern, and a casual jacket pattern that you like and really concentrate on getting those four patterns to fit you before you do any sewing. If you can't do it alone, ask a sewing friend to help you.

Mary Ray’s video discusses how to choose colors that look good on you.  From there she talks about color combinations.  Then she gives you tips about choosing fabric for your garments.  She said we usually choose our fabrics by:

l.  Color

2.  How the fabric feels

3.  Fiber Content

4.  How the fabric behaves when you sew it.  Some fabrics are more difficult to sew than others.

5.  What is in your fabric stash?  This is a good place to start.

At the end of the video there are several additional bonus items.  They include selected articles authored by Mary Ray that have appeared in Threads Magazine, a measurement chart, a color quiz, a resource list, and an essential wardrobe checklist.  All of the bonus items will aid in preparing you to design your wardrobe.

I know I have trouble choosing colors that look good on me as well as choosing colors that work well combined.  I am definitely going to view this DVD again to try to reinforce the information on choosing colors.   I think this DVD is a good resource for all of us who make clothes.  It gives so much information on the many subjects that need to be considered before we cut into a piece of fabric to make an article to add to our wardrobe. 

I am looking forward to using some of what I learned from watching Mary Ray’s “Design Your Own Wardrobe” DVD to sew a summer wardrobe.  I will be able to start it soon because my sewing hiatus is almost half over.

Good luck to you if you are planning to sew a new wardrobe.

Judy


Monday, January 24, 2022


Sewing Hiatus

Surprise, surprise!  I did not reach the goal I set for myself for sewing In January.  However, I did come close.  Both the brown and the black pants were finished in January as well as a tee top for each.  So, I completed four garments this month.  I did not fit a jacket pattern as I planned.  In fact, I did not even choose a jacket pattern.  I will leave that to a later date. 

The pants were made using Eureka! Pants that Fit pattern by Fit for Art Patterns.  The tee tops were made using the Anything But Basic Tee by DIBY Club.  My pattern was a combination of several sizes and I may need to tweak the pattern a little more the next time I use it.  I think I need a little more room in the sleeve and the armscye needs to be a little lower.  Pictures of the four garments are shown below.


I am now considering what I could do in February.  I want to be realistic, so I have decided to do absolutely no sewing at all.  I know that sounds a little drastic, but I am not giving up on sewing.  I am simply taking a sewing hiatus.  I am going to be busy with other things, so I doubt I would have time to sew much of anything.  So, I think this is the perfect time for me to take a break from sewing. 

During this pause from sewing, I can use the time to do some research on sewing topics to hone my skills.  Indeed, this will be an ideal time to watch some of those many sewing videos I own but have never watched.  It would also be an ideal time to study some of those on-line classes I have that haven’t been started yet.  And it would be the perfect time to plan what I want to sew for the next several months. 

I realize I will not be able to do all this in the month of February, but that doesn’t really matter.  I will do as much or as little as I want while at the same time I will be relaxing with my husband and just enjoying life!

I hope you will do the same.  Sew when you want, but don’t forget to enjoy life with those you love!

Judy


Sunday, January 2, 2022


Getting Started in the New Year

I decided to make myself get moving again on a sewing project.  I didn’t do much sewing the last two months of 2021.  I had no interest and no will power to sew.  I did make a few potholders and dish towels, but nothing that required much thinking.  I finally finished the brown pants that I started a while ago.  They were finished except for adding the waistband and hemming them.  When I put them on, I discovered they did not fit.  I had to take apart the side seams and rip out the pockets.   I took off some of the side seams before reattaching the pockets and resewing the seams.  I added the waistband and then hemmed the pants.  On New Year’s Day, I made the buttonhole and sewed the button.   I feel like I made those pants twice; however, the pants are finally finished and ready to wear!

I also cut out pants from a black wool-blend fabric.  I looked through my stash and chose some fabrics for tops to coordinate with my new brown pants and some that will work well with the black pants I just cut out.  I am not fond of cutting out garments, so I am thinking if I can get several garments cut, maybe it will be easier to get started sewing them. 

What are your sewing plans for the new year?  People spend time at the beginning of the year planning things like budgets, house redecorating, and vacations.  Maybe those of us who enjoy sewing should spend some time planning our sewing.  If we actually created a plan, we could probably have a better coordinated wardrobe and add pieces before we needed them.  I know if I need a garment and don’t have time to make it at the last minute, I get desperate and buy something that doesn’t fit properly and something I don’t really like!

I have a short-range plan that covers my sewing for the month of January.   My goal is to sew the black pants and cut and sew one top that coordinates with them.  I also plan to cut and sew a top that coordinates with the brown pants I just finished.  I would like to find a jacket pattern and alter it to fit me.  That should be enough for January.

If I am successful and finish those projects early, maybe I will have some time to make a sewing plan that covers two or three months.  You will notice I am not calling these plans a new year’s resolution.  That is because most resolutions are broken before January even ends.  If I am just making plans to sew things, I can probably rearrange my schedule to see those plans to fruition.  I may not feel the pressure that is brought to bear when new year’s resolutions are made.  And this plan is measurable.  If I resolve to sew more in 2022, I have no easy way to measure that.  On the other hand, if I say I am going to make certain items during the month, I can easily see if that goal is reached.

I hope you will make a plan to sew whatever you like in the coming year.  Put your plan in writing!  It will be easier to follow, and you can track your progress.  If planning a whole year overwhelms you, plan a month at a time.  Good luck with your plan!

Judy


Tuesday, December 21, 2021

 Tribute to Stoney Bretz


Warning!  This is not a post about how to sew anything or any new sewing technique.   No, this article is about the loss of a dear friend and a sewing enthusiast.  This morning (December 21, 2021) Stoney Bretz passed away peacefully at her new residence with her husband, Donald, by her side.  She got her third diagnosis of cancer about five months ago.  Our Wednesday morning sewing group was at her house when she received the call.  She took the news calmly as if it were just a call about a routine visit with a doctor.  I got a sinking feeling in my stomach.  I knew that this time there might not be a miracle.  I went home with a deep sadness in my heart.  I was afraid this time might be the last.  She was already having a lot of pain even before the diagnosis.

Stoney took the chemo and radiation treatments in stride even though they were painful, especially the radiation.  The pain never left her.  Each time I talked with her on the phone, her voice sounded weaker, and she sounded so tired.  I visited her at home a few times and each time I could see the weariness and the toll of the pain.

Then she fell during the night and was taken to the hospital via ambulance.  I knew things were getting bleaker.  Then Stoney and Donald were moved to a senior living apartment with care available for both of them.  I was relieved that they would receive the care they needed, but I also knew things would never be the same for my friend or for me either.  Life changes!

This morning I went to visit Stoney.  As my husband, her husband and I sat and talked, Stoney quietly and peacefully slipped away.  She escaped that horrible pain and went to eternal peace!

Stoney had many friends in the local sewing community.  She hosted three different sewing groups at her home; providing sewing machines for everyone in the groups so they wouldn’t have to transport their own machine for the meetings.   She shared a wealth of knowledge about quilting, sewing, and embroidery with all of us in those groups.  If someone needed something they forgot to bring, Stoney could usually come up with it.  I think I sewed with Stoney in these groups for about twenty-five years.  I enjoyed all those years and thought they would continue forever.  All good things really do come to an end eventually!

Stoney was a member of the Lansing Clippers American Sewing Guild and hosted meetings for the Embroidery Neighborhood Group at her home once a month.  She was also a member of a local quilt guild and a painting guild.  She was always generous with her time and her talents.  She taught many of us how to quilt and taught others how to improve their sewing, quilting, and embroidery techniques.

Stoney Bretz has left this earth but will not be forgotten!  May she rest in peace.

Judy


Wednesday, December 1, 2021


Are You Inspired or Driven to Sew?

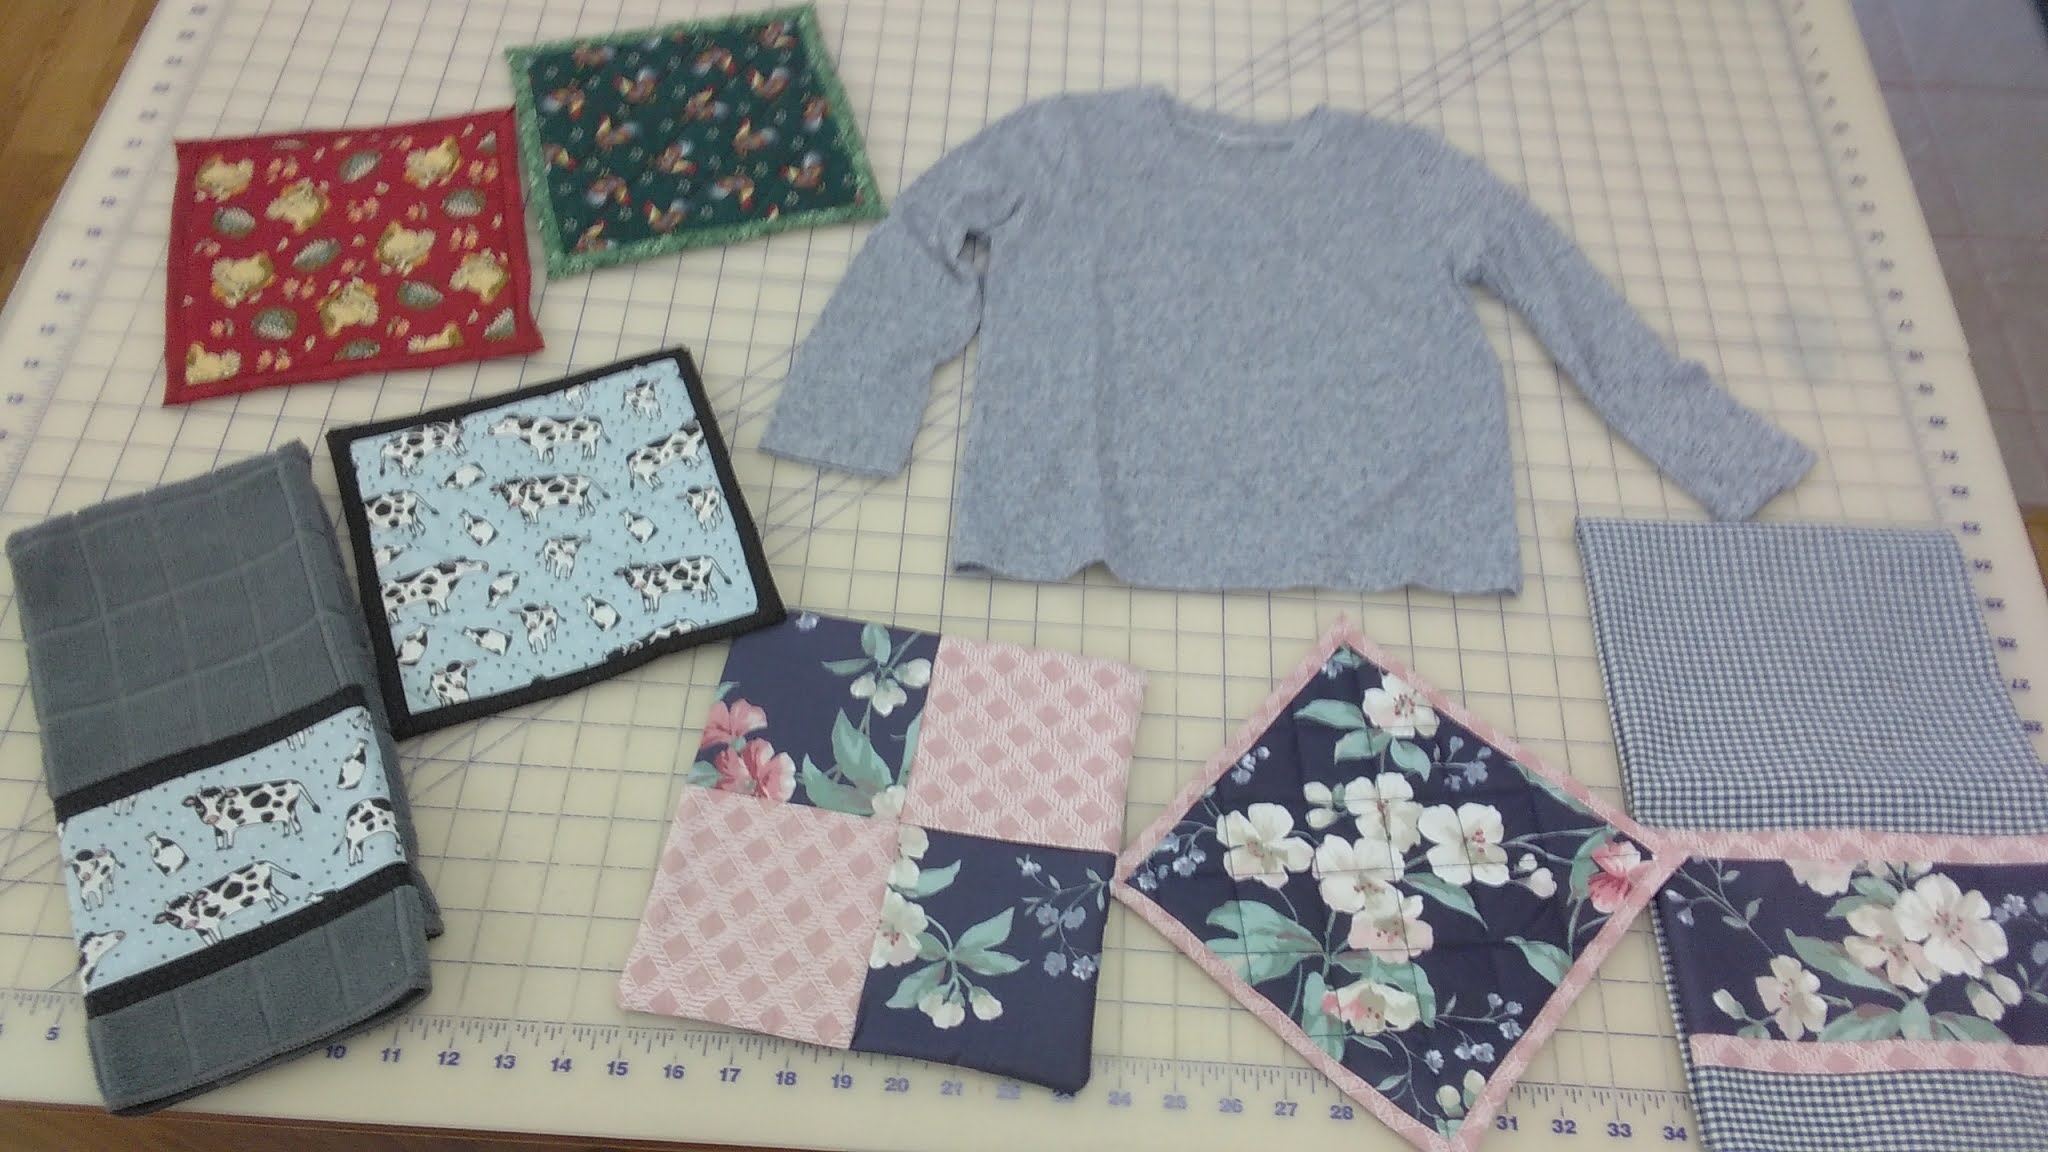
Usually, I sew garments or bags and then post an article on my blog about the item.  Lately, I have not sewn much of anything and, therefore, I haven’t posted on my blog.  It isn’t that I haven’t sewn at all.  I have, but it has been a hodgepodge of items.  The mixture includes children’s tee shirts, potholders, dish towels, and hot pads.  I have also altered tee shirts and pants that no longer fit me.    All of this caused me to wonder if I am inspired or driven to sew.

One definition of inspire is “to stimulate or impel to some creative or effective effort”.  That said, I am often inspired by many sources.  I get ideas and inspiration from seeing what others sew.  That is why I love to belong to different sewing groups.  I also like to see what styles are current in ready-made fashion.  Inspiration is there for the taking.  And remember, what you sew may inspire others to sew. 

Perhaps you are inspired by the creative process.  I think most people I know who love to sew fall into this category.  Create can mean “to make or design something requiring art, skill, invention, etc.”.  I think we can agree that every time we sew something, we make something that requires skill.  Sewing can also require imagination and invention.  Sometimes we have to create a different way to get the end result we desire.    

 One definition for drive is “to work or try hard to reach a goal”.   It can also mean “the power or vigor to get things done”.   We need drive to finish those projects we start.  Sometimes the projects are difficult and time consuming.  Then we need the drive to push through and complete the job.  We also need drive for the mundane ones as well.  Those could include mending, altering, and making small gifts, i.e. potholders, dish towels, etc. 

We may be inspired to make clothes for ourselves, but maybe the standard patterns don’t fit our bodies.  In that case, we definitely need the drive to develop fitting skills in order to reach our inspired goal of sewing clothes. 

In answer to my question, I think we are both inspired and driven to sew.  The really good thing about sewing is the more you sew, the more skilled you become.  And the more skilled you become, the more inspired and driven you are!  I don’t know about you, but I intend to keep sewing and I know the inspiration and drive will be there for me.

Below is a picture of some of the simple, easy items in my hodgepodge of sewing.


Judy